 Last time we had talked about moving to WPWebHost. During the migration process, you did not really notice any downtime, did you? (Except a few hours, when I stupidly deleted an .htaccess file and did not even bother to notice! Over confidence..sigh…) The reason is, we had overlapped our servers during the migration. Well, what does that mean to you? Nothing but a smoother way to move WordPress site to another host without causing a downtime (If you do not delete the htaccess file like me of course). Also, it would have been impractical for me to download gigabytes of data and then upload it again to the new server. So, I simply used wget command over SSH to copy the files and database dumps remotely. Following a few strategic steps, we came back online with the new server within a day (actually we never went offline because our old server was backing up during the DNS propagation). Now, don’t confuse it with the time needed for copying and moving your site from one server to another. Basically when you are done with moving your site, then you have to update the nameservers of your domain which takes the maximum time. So, the one day we waited, includes everything from site migration to DNS migration.
But this guide expects a little bit knowledge and some requirements though. Basically not much, but
- The new server should have SSH access enabled for remote copying. Most modern webhosts give this feature (even on shared hosting).
- You should have basic knowledge on SSH. If not, then check this guide to learn how to login to your SSH from your home.
- The rest, you can reply on this.
So, let us start.
#1: Add your domain to the Host:
The first thing you need to do is, ask your webhost to add your domain (ignore this step, if you have added already).
In cPanel hosting, you buy the host with a main/primary domain. If you are concerned about moving the same (the primary domain you registered with cPanel) domain to your new server, then it is already added in your cPanel as the main domain and right now you have to access your cPanel through your Web Host IP address. In such case you can safely ignore this step. But wait! Do not change the name servers of your domain right now. Keep it pointed to the old one, until we move the site.
But, in our case, we have registered through a domain which is different from the sites we had to transfer. So, we asked our webhost support to add those domains as addon domains in our cPanel. This was necessary as cPanel will not let you add a domain, unless it is pointing to the said name server.
So, at this stage, we have:
- Our domain under migration already added to the cPanel of the new server.
- The nameservers of the domain, still point to the old hosting server.
- We have the IP address of our new hosting server.
#2: Housekeeping first:
Before we actually attempt to move, we need to do a little housekeeping:
- Make sure you approve all comments on your WP site. (Although not necessary, but still)
- Clean the spam comments. There might be tens of thousands of useless comments in the spam queue. There is no need to move them to the new server.
- Make sure your WordPress is all up to date. This is not necessary, but is a good practice. In fact we updated all our plugins too before migrating.
- Deactivate and cleanup (remove) all the plugins that you do not use. I know, how lethargic we can feel thinking of doing this. But this is the high time, take advantage of it, get yourself a cup of coffee and do it now.
And those were all really. Lets move to the next stage.
For this tutorial, we will be moving our subdomain site pdev.intechgrity.com (which we use for all the plugin development and testing purposes, and which is quite private). But we shall give a full discussion with addon domain and/or primary domain. So this tutorial will work for you, no matter how and what domain you are trying to transfer.
#3: Zip the files and migrate:
Unlike other tutorials, we are not going to install WP on the new server and use the import function to move our blog. Instead, we are going to transfer all the PHP scripts so that it runs the same as the old server. To do this, we shall need to make a zip of our existing files so that we can move it safely with a single shot.
These are the steps you need to follow:
Login to your old server cPanel, go to Files > File Manager.
This should have opened your File Manager Program pointing to your public_html or www directory.
Now comes the tricky part. You need to understand which directory does your site reside in.
- If it is the main site, then the public_html directory is the directory you want to zip for remote transfer.
- If it is an addon site, then you need to see, where the addon domain points to. For us, it points to the pdev_itg directory. So, we would zip that directory.
#3.1: Zipping the entire public_html directory:
As said before, it will be needed in case you have only one site hosted through your cPanel and you wish to move that. We will be creating a zip of the entire directory like this:
- Select all the files/directories inside the public_html.
- Right click > Compress.
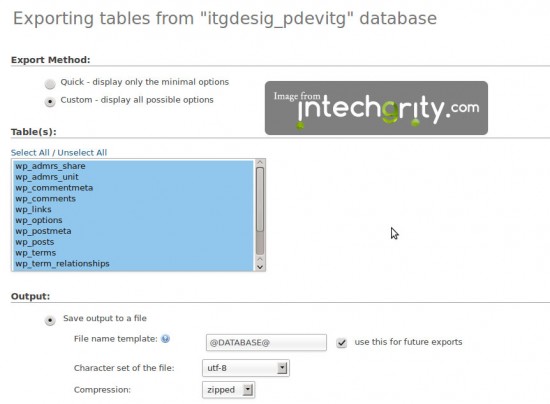
Check the screenshot above to get a more vivid idea. Once done, this will create a zip file. This zip should be accessible through the URL http://yourdomain.tld/zipfile.zip. Can you access it? Good, you don’t need to download it right now. As we have mentioned we will copy the file remotely (but still you can download it in case you want to keep a backup).
If you can’t access it, then it means, you have zipped the public_html directory directly and therefore the zip file is placed one level above the directory. Just move the zip file inside the public_html and it should be accessible again.
#3.2: Zipping the specific addon domain directory:
For this working example of this tutorial, we have zipped the pdev_itg directory where pdev.intechgrity.com used to point. The main domain of our old host was itgdesignbox.com. So, placing the pdev_itg.zip file directly under public_html, it is now accessible through http://itgdesignbox.com/pdev_itg.zip
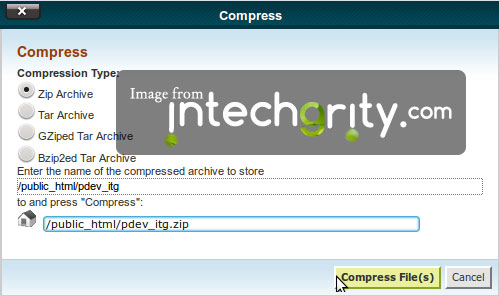

Still, we will not be downloading it, as this should be done remotely.
#3.3: Copying the file remotely:
First login to your newserver using SSH:
ssh -p 22 newuser@newhost.tld
Now, we will use wget command to copy our file from the old server to new server:
wget http://oldhost.tld/pdev_itg.zip
This should give you similar output like this:
--2012-07-17 09:38:30--  http://itgdesignbox.com/pdev_itg.zip
Resolving itgdesignbox.com... 208.82.117.203
Connecting to itgdesignbox.com|208.82.117.203|:80... connected.
HTTP request sent, awaiting response... 200 OK
Length: 11365710 (11M) [application/zip]
Saving to: `pdev_itg.zip'

100%[========================================================================================>] 11,365,710  1.61M/s   in 6.9s

2012-07-17 09:38:37 (1.56 MB/s) - `pdev_itg.zip' saved [11365710/11365710]
Which means the file is copied to your server.
#3.4: Unzipping and moving the files correctly:
First, we will unzip the file to a temporary directory named pdev_tmp:
unzip pdev_itg.zip -d pdev_tmp
Now we need all the files and directories of the migrating site directly under the pdev_tmp (for future purpose). In many cases (if you zip a directory to be precise) a top level directory is added inside the zip which is not wanted. So, we shall check this using the ls command:
ls pdev_tmp
If the output is not something like:
./ ../ pdev_itg/
Then you are in luck. But if you had compressed a directory, then the output should be similar to this. The directory name pdev_itg may vary for you, but whatever this is, we do not want this inside our root temporary directory. So we shall move all files/directories one level up and will delete the useless pdev_itg directory.
mv pdev_tmp/pdev_itg/* pdev_tmp/pdev_itg/.* pdev_tmp/
This will move all the files and directories, including the hidden ones (with a leading . in file/directory name) directly inside the pdev_tmp. To confirm, simply do a
ls pdev_tmp
and notice the difference. Hey! wait, we have forgot to remove the useless pdev_itg directory, let us do so, using the command:
rmdir pdev_tmp/pdev_itg
Now we are ready to move them to the final location.
#3.4.1: Moving the file for the main/root domain:
The main/root directory for your primary cPanel domain is the public_html directory itself. To move all the files/folders there, simply execute the command:
mv pdev_tmp/* pdev_tmp/.* ~/public_html
Now check it using
ls ~/public_html
and you should see all the directories copied over there.
#3.4.2: Moving the file for the addon domain:
Say, the pointing path of your addon domain is ~/public_html/pdev.intechgrity.com directory. So, we need to move all the files/directory under this. Simply execute the command:
mv pdev_tmp/* pdev_tmp/.* ~/public_html/pdev.intechgrity.com
Now to confirm, do a
ls ~/public_html/pdev.intechgrity.com
and you should see all your files there. Done? Good!
#4: Importing the database:
Done with the files, now comes the database. We have two options here:
- Use SSH and mysqldump command to get the dump of your database, copy it remotely and import it.
- Use phpMyAdmin to dump your database, then FTP the database dump and then use SSH on the new server to import it.
As we didn’t have SSH on our old host, so we followed the second method. But worry not, we are going to show you both the methods here. I would prefer sticking with the first method if your host permits. From here onwards, we have assumed:
- The db name is: pdev
- The database user name is: pdevu
- The database user password is: pdevpass
Replace it with the values you have.
#4.1: Using mysqldump to dump the database:
First login to your old host using SSH.
ssh -p 22 olduser@oldhost.com
Now, use the mysqldump command along with the redirection operator to dump the database in a sql file named pdev.zip.
mysqldump -u pdevu -p pdev > ~/public_html/pdev.sql
This will prompt for password. Enter it and the pdev.sql file will be created.
Zip the file to save some space.
zip ~/public_html/pdev.sql.zip ~/public_html/pdev.sql
And you are done.
#4.2: Using phpMyAdmin to create the dump:
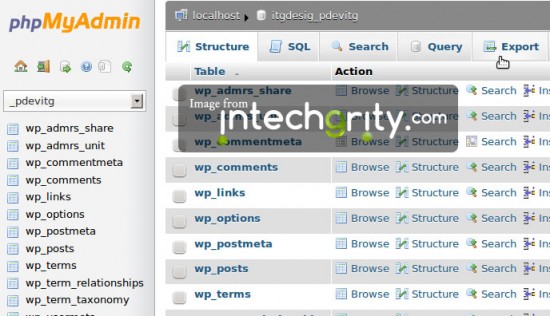
Select Database for Export
Login to your phpMyAdmin from cPanel, select your database and click on Export.
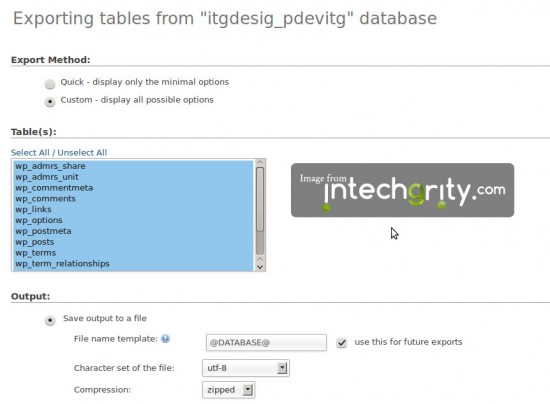
Select Custom and then choose zipped under compression.
Leave the other settings default, and hit the Go button. This will make you download a zipped SQL file. Copy it somewhere safe to upload it to the new server in the next step.
#4.3: Uploading the SQL file to the new server:
If created using mysqldump:
- At this point your sql file is accessible through http://oldhost.tld/pdev.sql.zip.
- Login to your new server using the SSH command:
ssh -p 22 newuser@newhost.tld
- Now use wget to copy the file (as before)
wget http://oldhost.tld/pdev.sql.zip
And you will have the sql zip file under the home directory.
If created using phpMyAdmin:
- At this point your sql file in somewhere in your local computer. Say the path is ~/Downloads/pdev.sql.zip
- Use the scp command to remotely copy the file to your new web host:
scp -P 22 ~/Downloads/pdev.sql.zip newuser@newhost.com:~/
And you have the file copied. This will also prompt for your password or passphrase, depending whether you have configured to use passphrase on SSH. Whatever, enter it and it will be copied.
#4.4: Unzipping and importing the file:
At this point, we assume that:
- You have already created a database on your new host using cPanel MySQL Database Wizard.
- You have the database name, user and password handy.
Now login to SSH if not already to your new host using the same command as before.
Unzip the sql file:
unzip pdev.sql.zip
This should give a file named pdev.sql on the same working directory (which is the current user home directory).
Now for importing, executing the following command:
mysql -u database_user -p database_name < pdev.sql
Hit enter and it will prompt for password. Enter the password you had used during the database creation process. If everything went correctly, you will not see any output on the console. But your database should have been imported as of now. You can use phpMyAdmin to check it.
#5: Update your wp-config.php file:
At this point, everything is just fine, except your wp-config.php file. You need to update its content so that wordpress picks the new database name and the new database user and the new database password . To do so, simply edit your wp-config.php file. You can download the file edit it and then upload it again using FTP, or use some console based editor like nano directly on the ssh.
nano ~/public_html/pdev.intechgrity.com/wp-config.php
This will give you the nano editor which looks like this:
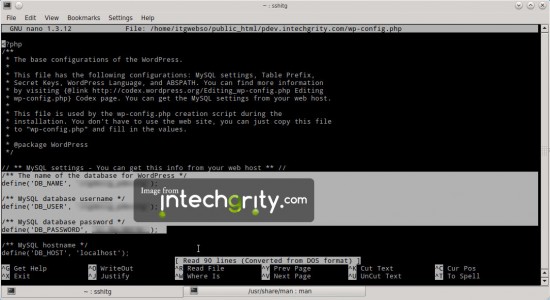
With new database credentials
Edit the highlighted line and fill it with your new credentials. Save it using Ctrl+O and exit using Ctrl+X. And you are all done.
#6: Test your site on the new server:
Enough work, but it is time to test. But wait, if you open your domain, then it will still point to the old server. So how do we test it? Simple, by editing our hosts file. This file consists of local Domain Name > IP resolve information. By editing this file, we can tell our browser to open the same domain, pointing to the new server. For this step, we needed the IP address of our new server. The file you need to edit is:
- /etc/hosts : For Linux and MAC
- %SystemRoot%\system32\drivers\etc\hosts: For Windows 7, XP, Vista etc
Edit the file using your favorite text editor (you will need to open the editor with super user privilege in case of Linux and probably MAC) and paste the following line at the end of the file:
XXX.XXX.XXX.XXX pdev.intechgrity.com
Where obviously you will need to replace XXX.XXX.XXX.XXX with your new server IP address and pdev.intechgrity.com with your own domain.
Now save the file and you are done.
#6.1: Initial Testing:
Open up a browser and clear all the cache. In windows, you might need to do a ipconfig/flushdns from a command prompt to flush the DNS cache. Open your site and now, you will see everything working just like a charm.
But wait! There is something wrong.
- Go to your site wp-admin.
- Login and go to media and upload a new file.
- You will probably see a permission error with this.
Why? Because, WordPress stores the absolute path of the upload directory which has changed with the webhost. What to do now? Simply follow these steps.
#6.2: Fixing the Media Upload error:
Create a PHP file named path.php (with your favorite text editor, say notepad?) and inside it put the following code:
<?php
echo dirname(__FILE__);
?>
Upload it to the public_html/pdev.intechgrity.com/wp-content/uploads directory. Now run the file by opening similar URL in your browser http://pdev.intechgrity.com/wp-content/uploads/path.php.
This should output a string that is the path to that directory. Say it is /home/user/public_html/pdev.intechgrity.com/wp-content/uploads. Make a note of it.
Now go to wp-admin>Settings>Media and there under the Uploading Files section put the same string inside the Store uploads in this folder text input.
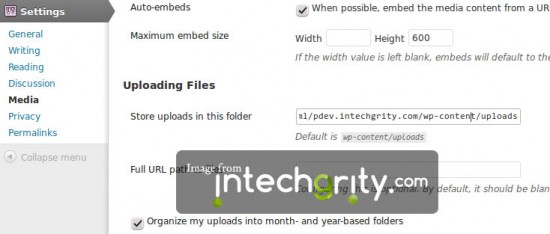
Save changes and you are done.
#7: Updating the Name Server:
So, now that everything is working properly, it is time to update the name servers of your domain. Simply login to name.com, godaddy.com or whatever domain provider you use and edit the NS and update it with the new ones given by your new web host.
Now just wait and relax. It takes usually 1-2 days for complete DNS propagation. Oh! and don’t forget to delete the lines you added inside your hosts file to check when your nameservers have been updated and when you can resume blogging again.
In the meanwhile, you might lose a few comments, but you can import them manually from the old host.
Now hey, how am I supposed to login to the wp-admin from my old host?
Well, again edit your hosts file, but now, put the IP address of your old server. The rest is given as a “brain exercise”. But if you can not do it, then yell at the comments. I will answer it there.
Conclusion:
Moving your sites from one host to another has never been so easy. But we’ve tried our best to make this as simple as possible. Following this tutorial, there is a 90% chance that you will do everything correctly and rest 10% really depends on plugins and themes you are using.
If anything fails, you can ask me in the comments. I will try my best to solve it. Also remember, with most modern web hosts, we get free migration service. Like here at WP Web Host, I got a free migration offer too. But I just like to do things at my own. Please don’t take it as an offence, but if you are not technically sound, or don’t have enough confidence, then free migration should be your first choice.
And for the rest, who like to have some fun with their websites and servers, this tutorial has given enough I guess. So leave your feedback and let us know how you are doing…

great article i need this article thanks sharing this 🙂
You are most welcome 🙂